
|
|
|
|
11/30/08 |
|
|
To add vented discs to an SS1...New info!! SS1 Brake Disc Dimensions Chevette Disc Dimensions Carlton Vented Disc Dimensions Venting your SS1
Many people find the braking on the SS1 marginal for fast road use, despite the use of a 4-pot calliper. The small disc, and equally small pad make for an unacceptable build-up of heat which leads to fading, something which should not occur to a car with the performance of an SS1, especially a Turbo! After partaking in one of these "Classic Tours" where I had brake fade descending towards the Blue John Caverns in Derbyshire, I decided it was time to do something about it! Not having the funds for a German Porsche calliper conversion, or for the AP based kit used by Nigel Reeves on his sprint 1800Ti, I looked to alternatives. The main objective, however, was to ensure that the conversion would use only off-the-shelf components. In the research for the SS1 Alterpart (which never happened!) the front suspension was identified as Vauxhall Chevette based. A bit of lateral thinking initially towards the 2300HS, and finally MKI Cavalier resulted in the purchase of two Cavalier uprights. Sadly these didn't fit as the bottom balljoints are larger on the MKI Cavalier. Chevette ones, however do fit. Don't forget to take the wheel nuts as the studs may be metric or imperial thread on your SS1, and you don't want to find out when you're putting the wheels back on. I now have the taper roller bearing uprights... The search for a vented disc and accompanying calliper which would fit the dual line system of the SS1 led to the scouring of a Brake Disc catalogue which revealed the perfect disc - MKI Carlton (the one with the droop nose) 2000i, also believed to be Manta GTE (but not yet confirmed). Now the for the callipers... What has four pot callipers? For rear wheel drive Fords, the only one to use is the Austin Princess AP calliper, basically the larger brother to the standard SS1 calliper. Shame, however that the mounting centres for the bolt holes don’t match up to the Chevette uprights (or the SS1 ones for that matter!). Finally Nigel Reeves came up with the answer - Volvo 240 4-pot callipers. These can come already spaced out for vented discs, and have the correct bolt centres. With a small 1/16 washer to centralise the calliper on the disc, these sit wonderfully. A little thinking later, the conversion was complete, the final parts list being as follows:
Uprights: Vauxhall Chevette (there may be two sizes of bottom ball joint – get the smaller one) Discs: MKI Carlton 2000i (77-81) Callipers: Volvo 240 with Girling Vented discs Spacers: 2x 1.6mm(1/16") M12 washers Pads: Ford MkII Granada 2.8i / P100 Pickup Locating Pins: Granada 2.8i (without modifying pads). Hoses: The standard ones are not long enough. Some short pipes could be made up in Kunifer using some in line connectors and brackets. I splashed out and had some made up by Goodridge in Stainless/PTFE, 500mm long with calliper male and bulkhead male connectors. These were secured by a small bracket and two ‘P’ clips fixed to the top bolt hole. Wheel spacers: MAY be needed depending upon individual wheels. I tried it with a few wheels, some needed a 3mm disc spacer, others needed a 5mm spacer, some needed none at all! Trial and error, I’m afraid.
The cost?
Uprights: £10 each from the local breakers including the hubs and bearings. Discs: Genuine Lockheed BG569, £76 pair (since found to be cheaper!) Callipers: £10 each from breakers, Recon £140/pr exchange from Hi-Spec Motorsport, seal kits £26/calliper from your Lockheed agent. Spacers: Raid the washer box! Pads: Without wear indicator (Lockheed LP184, Girling GDB408) - about £13 With wear indicator (Lockheed LP238, Girling GDB410, connector not identical...) - about £20 Pins: £6 for the complete Volvo kit, again Lockheed. Hoses: £52 for the four, delivered to my door. Miscellaneous: Fluid, clips, etc - £5
Total: About £320-330 (For recon callipers, Lockheed discs and Goodridge hoses)
Can be a lot cheaper if you go for non-Lockheed discs or recondition the callipers yourself.
3. How to do it.
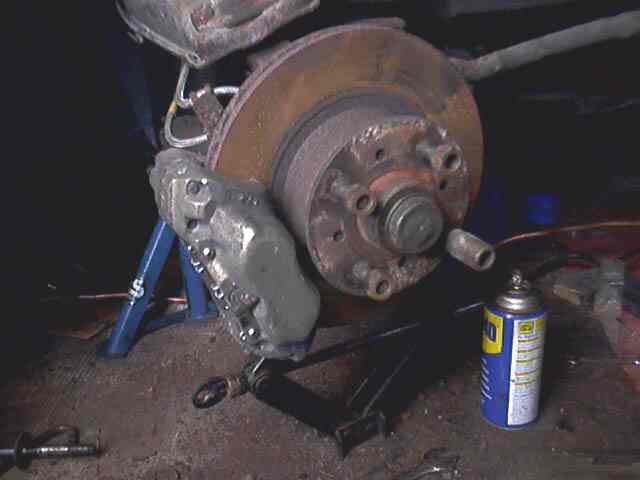
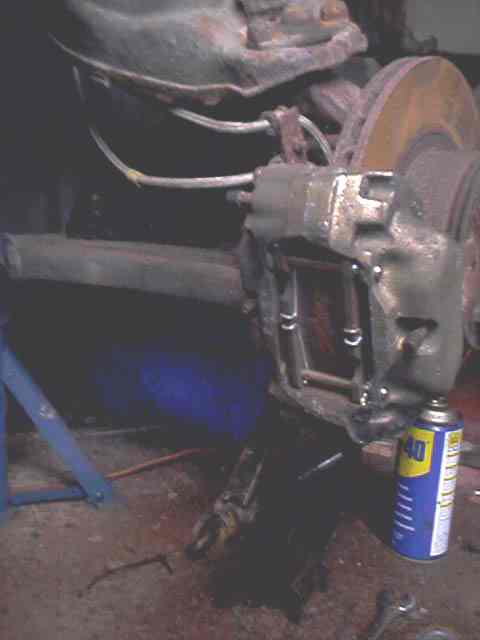
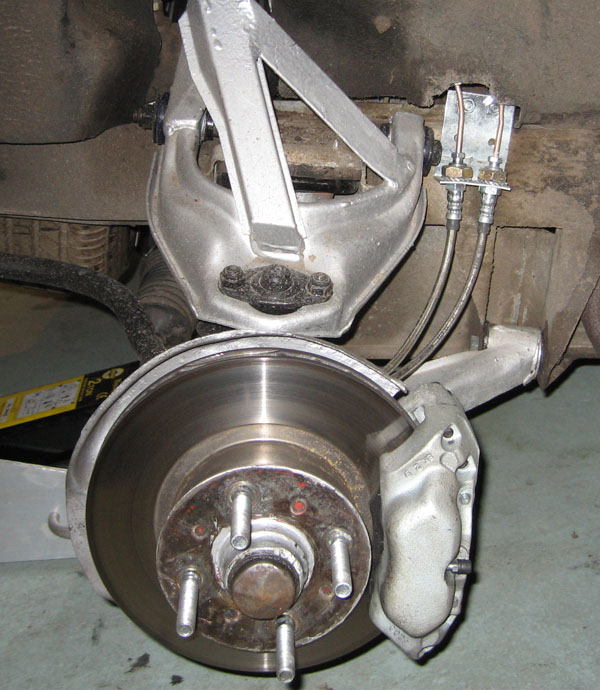
Firstly, the uprights. If you bought the uprights with the callipers attached, remove them first and throw them away, but keep the bolts. Next, tap off the grease seal on the front with screwdriver to expose the hub nut with its split pin. Remove them both, throwing the split pin away (as you always should...), but keeping the nut. Holding the disc with both hands, give it a little sideways wiggle and pull it clear with the outer bearing and washer still inside it. Depending upon your own standards, either remove, clean and regrease the bearings (if they look okay), or replace both the bearings, the oil seal and the tracks with a proprietary kit. Now turn the hub assembly over , and undo the four disc retaining screws using a 10mm spline tool (looks like a torx bit, but with more splines). Tap the disc off the hub itself, and throw away. Now clean the hub, especially the disc mounting surface - it must be spotless, otherwise unbelievable wheel wobble will ensue. Take your nice new disc, and fit it to the hub using a torque wrench set to 30lb/ft. Remove the three 10mm AF screws holding the dust shield onto the upright - be careful as they have a habit of rounding their heads off. Use some WD40, Plus Gas, on the backs of them, and if possible use a 6 point socket as opposed to the normal 12 point ones. After the struggling, throw it away, as the larger callipers would foul it. Now is a good time to clean the upright if you haven't already done so, and paint it (but don't paint the stub axle, or inside the eyes where the balljoints fit...). You can now fit your nice clean hub/disc assembly, taking care not to damage the grease seal on the back. Make sure that it is adequately greased, but don't overdo it, otherwise it'll only find its way onto the disc. Fit the outer bearing, also greased up, and refit the nut and its washer, to finger tight whilst rotating the disc to ensure the bearing is centralised. Now tighten to 20lb/ft whilst rotating the disc/hub. Now undo the nut until a 1 to 4 thou feeler gauge can be inserted between the washer and the nut. The variation in gap is to allow you to line the hole in the stub axle with the notches in the nut so that a new split pin can be fitted. Put a little grease over the top of the nut and refit the grease cap. Next come the callipers. They have a right and a wrong way up. There are three bleed nipples, one at one end and one each side in the middle. The calliper needs to be fitted with the single nipple to the top otherwise you will not be able to bleed the system! Fit the calliper to the upright with the spacers between the calliper and upright. Now check the disc is central to the calliper (either by eye or by measurement) and if necessary adjust with a slightly smaller or larger washer as required). Ideally, it needs to be centralised using feeler gauges, but it can be done successfully by eye, using the pad locating lugs at the inner end of the calliper (look inside the top of it and you'll know what I'm on about). When centralised, tighten the bolts up to 72 lb/ft. Now fit the pads and pins, using Copaslip or similar on the backs of the pads, secured by either the Granada pins (a little bit long), or the Volvo pins (the holes in the pads need opening out a bit with a drill). If you look at the flexible pipe arrangement on the SS1 where it fits into the calliper, you will see the entry points are a little bit different on the Volvo callipers. To this end, there are two alternatives. You can fit longer hoses (i.e. Goodridge/Aeroquip) and by means of a bracket fitted to the top calliper mounting bolt tie them away from the spring, thereby routing them around the back of the calliper. The alternative is to make up a bracket, again fixed on the top calliper mounting bolt, and run two small metal pipes up to a female union, so that the existing rubber pipes can be connected. I initially tried the metal pipe version, but the Goodridge version is much easier and neater, and if new hoses are required anyway, a lot cheaper. A word of warning: fit the hoses to the calliper before you fit them to the car. It's a lot easier. Now for fitment. Fitting the new assembled uprights involves the splitting of the two balljoints and on the steering track rod end. If any of these joints have any play then they should be replaced. If like me you split two of the balljoint rubbers when removing the upright, the rubbers are available. The one I used for the bottom balljoint was intended for the track control arm on a MKII Escort, but fits very nicely.
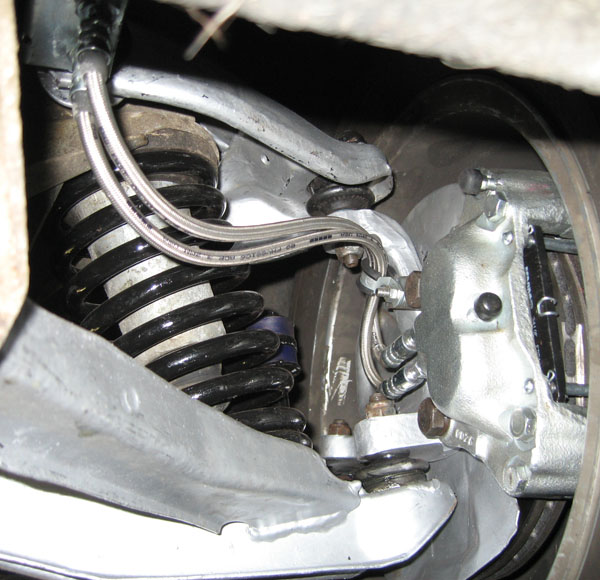
Jack the car up and support on axle stands. If possible have a bottle or trolley jack to sit under the bottom balljoint, otherwise the spring may make it very difficult to reassemble. A quick tip is when splitting balljoints, leave the nut on the thread by a couple of turns - It stops anything dropping suddenly when the joint cracks. Release the brake flexible pipes where they disappear through the inner wing. Loosen the actual union first from in the engine bay (be prepared for spillage) then remove the securing nut on top of the mounting bracket, after which the pipe can be withdrawn into the inner wing area. Do this for the other pipe as well. Split the balljoints and remove the brake pad warning wire (offside only), then remove the complete upright. Drop the upright onto the bottom balljoint first, start the nut off a few threads, then pop the top one in. Do both of the nuts up, then drop the steering balljoint in, and do its nut up. Now you can see the problem with the brake hoses. What needs to be done is for the two hoses to do a 180° bend where they exit the calliper and over the top mounting bolt. A small bracket, about 75mm long needs to be made up with a 12mm hole at one end, and a smaller hole at the other end to take 2 P clips to hold the hoses parallel. The bend needs to be quite tight, to stop the hoses catching the upright, and for enough hose on full lock. The hoses then go into the holes vacated by the old ones, making sure that they don't get twisted in the process. If you've done it right, the two hoses will remain reasonably parallel on their own. Reconnect the solid brake pipes, and now bleed the brakes, preferably with either a vacuum or pressure bleeder, not with the foot as it can mess up the piston inside the master cylinder. The need for spacers or not will be self evident when replacing the wheel and trying to turn it. Fit as required. So far, I have tried to fade these brakes with no joy at all. They just keep stopping on a sixpence from whatever speed i'm doing. The front/rear balance is still similar, I don't feel the need for larger rear wheel cylinders as I can't lock the brakes up in the dry. Happy braking!
Mine after a years use and 2 years storage:
Freshly done (by Trevor from Eindhoven):
This site was last updated 11/30/08 |
Reliant Sabre Scimitar SST SS1 1300 1400 1600 1800Ti Turbo injection intercooler RSSOC